
Locked out of Windows and cannot login just because of password expiration? This occasion usually happens when you haven’t used a computer for a long time or that you didn’t change the password according to the prompt timely. Generally, the default time limit allows users to change their password before expiration is 14 days. While in Windows 7 and Windows Server 2008 R2, the default time limit is 5 days only. If you neglected it and left it alone, then you will be locked out of the Windows days later.
The password expiration is one of properties for user accounts on Windows. This property is disabled by default on Windows 10/8/7. But occasionally, this property might be changed by somebody else without your permissions. If the password expiration is enabled, once the deadline is up, Windows will alert that your password has expired and it must be changed. However, constantly changing password may be annoying an make it easy to forget your password. Now in this post we will show you how to disable password expiration in Windows 10. Three ways are as followed.
Disable Password Expiration by Local Users and Groups

Step 1: Open the Local Users and Groups window.
Step 2: Click on the Users folder on the left-side pane to show all user accounts on the right-side pane. Select the user whose password expiration you want to disable, right click on it and select Properties.
Step 3: After the user’s Properties dialog opens, select the General tab, check the “Password never expires” checkbox and click Apply followed by OK.
Turn Off from My Computer
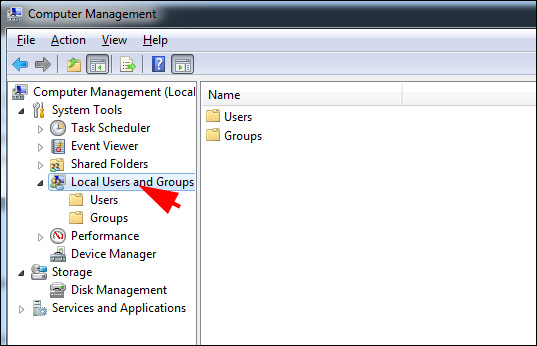
Right click My Computer and choose Manage option to open Computer Management window, and later double click Local Users and Groups, choose Users file. When it shows you all the accounts, double click the account you want to turn off its password expiration. Later, tick in the checkbox before Password Never Expires option. Click OK and close the window. You will get rid of frequent prompts to change your password.
Turn Off by Command
Open an elevated command prompt and type in the following command:
“net accounts/maxpwage:unlimited”
The disadvantage of this option is that it set the maximum password age for all accounts on your computer to unlimited.
If you want to turn off password expiration for an individual user account, you can execute the command as follow:
“WMIC USERACCOUNT WHERE Name=‘XXXX’ SET PasswordExpires=FALSE”
Conclusion
By choosing on of the above three methods, you can turn off password expiration to your specific user account easily and won’t bothered again by the prompts.
Windows XP may notify you at log-on that your password will expire in a number of days and ask whether you want to change it. This behavior can start months after your initial installation of Windows XP. Its purpose is to help enforce password policies in a business environment. But if you do not need that enforcement, it can be very annoying. To turn off the waning, go to the Control Panel and launch the Administrative Tools. If you happen to be using the Category view, look under Performance and Maintenance. Next, launch the local Security Policy applet. In the left tree, double-click on Account Policies and then select Password Policy. Find the item titled Maximum Password Age in the right-hand pane and double-click on it. If you set this value to 0, your passwords will never expire.
Related Reading: What to do if you forgot your password access to your PC